PLEASE NOTE MOST OF THIS IS FROM 2015 and the photos are pants! I am going to redo the technique and update with a new video and walk through showing how to apply shadows for a 3D effect.
We have updated the technique and Emma did a YouTube video in 2017 : https://www.youtube.com/watch?v=v3wE_FQ1ycs
If you found inspiration from our technique or video please don't forget to credit or mention Inkylicious.
2015: Apologies to all who have been waiting for this ....
A quick walk through on creating the parchment effect as shown on our TV show.
Whether you have purchased one of our 'Winter Bauble Kits' or the goodies separately here's how to create them.
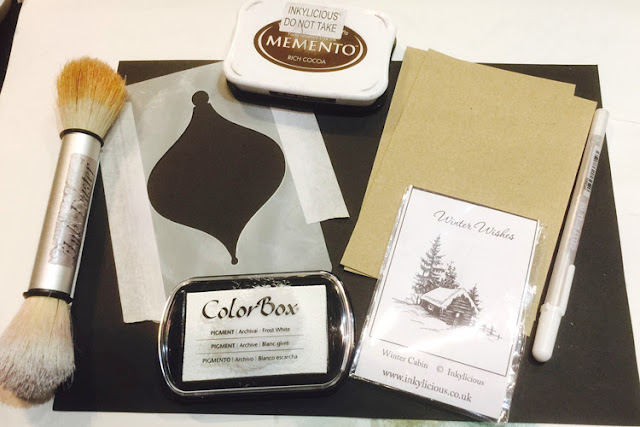
What I've used:
Inkylicious Winter Cabin or Winter Lodge stamp
Bauble Stencil (or shaped stencil that can fit your stamp inside)
We now use: Brilliance White Ink Pad
Ink Duster or blending brush
Sakura White Pen (this is water based so we can blend the colour out)
Memento Rich Cocoa (for stamping the image)
Low Tack Stencil Tape (to hold the stencil down)
Quickie Glue Pen (great for detailed glittering)
Inkylicious Iridescent Glitterz (for added sparkle)
Medium Waterbrush or paintbrush)
In the 'Winter Cabin Bauble Kit' :
A6 Bauble Stencil
Winter Cabin Stamp
Dew Drop White Ink Pad
Sakura White Pen
Fluffy Puffy Stuff
5 Sheets A5 Stamping Kraft Card
In the 'Winter Lodge Bauble Kit' :
6" Bauble Stencil
Winter Lodge Stamp
Brilliance White Ink Pad
Sakura White Pen
Sakura Stardust Clear Pen
Quickie Glue Pen
Inkylicious Iridescent Glitterz
5 Sheets A4 Stamping Kraft Card
So here's the products I'm using
Step 1:
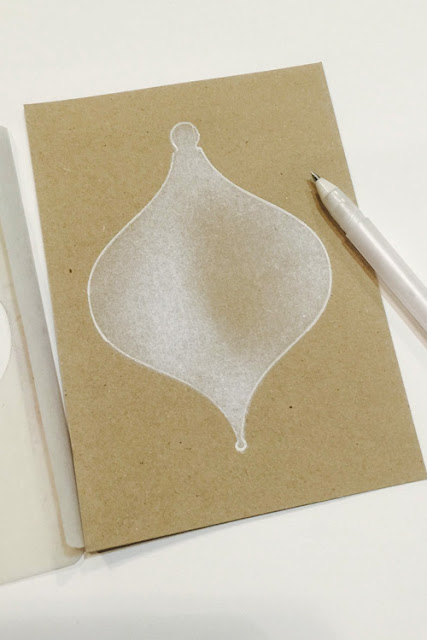
Using Low Tack Tape, tape the stencil on to the Stamping Kraft Card, Hint: I wrap the tape under one side as a hinge so I can lift the other side and check the depth of colour.
Apply the ink around the edges of the stencil on to the Kraft Card - remember the Brilliance white ink is very thick and opaque so you only need a little ! Lift the stencil on the unhinged side if you wish to check the depth.
Step 2:
With the stencil still in place use the Sakura White Pen to draw an outline around the inner of the stencil. Hint: To quickly get the ink flowing to the nib - hold the pen with the nib at the bottom and flick the pen like a thermometer.
You can lift the stencil on the unhinged side if you need to check the line to see if you have missed any.
Step 3:
Line completed - ready for stamping.
Step 4:
Now you can, if you wish, stamp the image with the Brilliance White Ink Pad (I'll show you that in the gallery this weekend) whatever you do - don't stamp in a Black ink - you are trying to create a nice parchment effect and black is way too harsh ... we like to use the Memento Rich Cocoa so we can then add white highlights with the Sakura Pen.
Step 5:
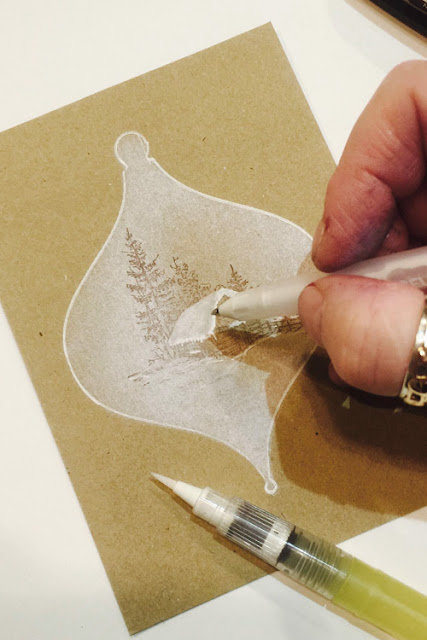
Using the Sakura white pen, colour the parts of the image where snow may naturally lay such as the fence, branches and yes the roof! Use the white pen to scribble a heavy line of white around the lower edge of the roof, then using a waterbrush (paint brush and water if not) blend the white line out to the top of the roof, blast with a heat gun to quickly dry. Add more white around the edge of the roof for more definition.
Almost Finished .... So here's mine coloured in with the Sakura White Pen. Did you remember to colour the chimney pot and add some white smoke? I've also added snowfall dots.
Time for some Sparkle !
Use a quickie glue pen and glitter to add some sparkle.
So this is just a very quickie walk through for you. I'll get a video done this weekend and also a gallery of lots of different ones using same baubles but different stamps, same stamps but other stencil shapes and I'll also show you how to tint the white to give even more effects.
These two below are from 2021.


That's great, Deby, thanks for posting it. I was never really a fan of kraft card - until I saw your fabulous cards at Stamp Magic. I really like the effect. Will look forward to seeing more photos. Hope Emma is feeling better soon.
ReplyDeleteWhat a fab card! I brought that stamp at Portsmouth Sincerely Yours and I love it so thank you so much for showing this. I too look forward to seeing more, I LOVE Inkyicious! Get well soon Emma
ReplyDeleteAn excellent design and thank you for sharing the tutorial.
ReplyDeleteJulia
So glad to see the blog spot up and running. Have bought several of your stamps etc and look forward to seeing more ways to use them on here.
ReplyDeleteThis 'bauble stencil' tutorial is brilliant, thanks for sharing it, can't wait to see the video.
Wow this is fabulous,great tut.xxx
ReplyDeleteYou've just made my day Deby! I love your stamps and I have so many of them so it will be great to come and visit your blog for inspiration. I bought the Winter Cabin Stamp a while ago and I've loved using it. Fabulous tutorial x
ReplyDeleteHi
ReplyDeleteLove this tutorial,watched the tutorial at the NEC and thought it was great then.
I'm loving the Blog. I have been checking your web page to check if you started a Blog so now I'm so pleased and looking forward to your demos and banter.
I'm delighted to see that you have started a blog. I recently bought some of your lovely stamps and it will be great to get some inspiration here. Your card is gorgeous, thanks for the tut x
ReplyDeleteGreat to see the blog up and running Deby. Hope Emma is on the mend soon x
ReplyDeleteWonderful card just popped over from Sal's blog, love this technique going to pin it... And also going to join your blog... Hope you might pop over to mine too!! :)
ReplyDeleteShaz in Oz.x
Great card Deby, very excited about your Blog, love your stamps.
ReplyDeleteA great technique and tutorial, thanks for posting it on here. I bought the stamps at the NEC but could not get near enough to the table to see you demo this.
ReplyDeleteSue xx
Hi Deby, nice to see you back in Blogland! These cards are stunning and the tutorial is great. I'm sorry I missed you demoing the technique at Donny....you were taking a well earned rest from the demo table when I dropped by. I hope Emma is on the mend!
ReplyDeleteHugs
Lesley XX
That is beautiful. Thanks for sharing how it is done. Kate x
ReplyDeleteThat is beautiful. Thanks for sharing how it is done. Kate x
ReplyDeleteJust followed a link from Crafty Salutations over to this tutorial, after I saw Sally's beautiful cards using this technique..(which I thought was a delicate vellum). My goodness, this is just gorgeous, and although I don't have exactly the same stamps, I do have the inks & crafts and some images that might work to recreate this wonderful look. Just became your newest follower...Love Inkylicious products...is there a USA source? TFS
ReplyDeleteGreat tutorial - Thank you :) x
ReplyDeleteWill definitely be buying the goodies to make this card, so beautiful. Hope you are at Thetford in Jan.2016
ReplyDeleteI'm a bit late but thanks so much for this, it's so interesting to see how you did it. The card and the effects are lovely.
ReplyDeletebeautiful, thank you for showing to us how this effect works
ReplyDeletehugs maria xxx
stunning. loved shows
ReplyDeleteBeautiful is there a video yet?
ReplyDeleteOn Hochanda Catch Up ....
Deletehttps://www.hochanda.com/Cinema.aspx?tvId=8603&date=06-07-2016&time=10&watch=Inkylicious+Christmas
https://www.hochanda.com/Cinema.aspx?tvId=8606&date=06-07-2016&time=13&watch=Inkylicious+Christmas
wow - absolutely stunning - just bought a load of stamps will now have t buy more stuff :)
ReplyDeleteBeautiful result :)
ReplyDeleteGreat shows Debbie and this card is stunning :)
ReplyDeleteVery beautiful and will be trying it. Thank you. Edna Burgess
ReplyDeleteThis is a beautiful technique. Thanks for sharing the tutorial.
ReplyDeleteGorjuss. Love it. It's really beautiful and so inspiring. Thanks for sharing. Hugs, Keti
ReplyDeleteBeautiful! Thanks for tutorial!
ReplyDeleteIt really feels good to find an idea blog post such as this, nice articles.
ReplyDeleteBeautiful cards. Thanks for sharing and the tutorial.
ReplyDeleteGreat card(s) I like the softness of these cards, yet they have quite the impact!
ReplyDeleteI stumbled upon this and fell in love!
ReplyDelete